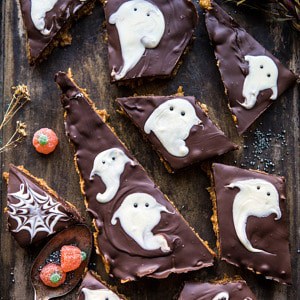
BOO! Chocolate Peanut Butter Bars.
BOO! Chocolate Peanut Butter Bars. You don’t need to be a professional baker to make these deliciously EASY homemade Halloween treats. These bars require no oven time, use just 6 pantry staple ingredients, are made without extra sugar, and take almost no effort to make. Best part? They’re fun to make no matter what your age!

BOO! It’s Friday, it’s October, and that means I’m finally sharing some Halloween inspired treats.
You know what I love most about Halloween? No matter what age you are, it’s an excuse to dress up, have fun, eat candy, and just let the kid in you shine for a day. For someone who’s way too serious most of the time, this is so good for me. All month long I have so much fun being creative and making Halloween inspired treats, crafts, and of course, cocktails.
These bars are some of my favorites of the month for two reasons.
One, and most importantly, these bars are GOOD. Like so deliciously good. You all know I love the combo of chocolate and peanut butter. In fact I’ve been called out for using it too much…sorry, but not really because I love it!
Peanut butter and chocolate. Simple and Perfect.
Two, these bars are EASY. So, so, so easy. Easy enough that if you can make yourself a peanut butter sandwich, you can certainly make these bars. It’s true.

As mentioned, these are made using six pantry staple ingredients. Honey, maple syrup, peanut butter, chocolate, and white chocolate, that’s it. Yep, no additional sugar.
To make the bar base, melt together the honey, maple, and peanut butter until smooth and creamy. Stir in the corn flakes and dump the mixture out onto a baking pan.
Now add a very thick, even layer of melted chocolate (you can use dark, semi-sweet, or milk, use you favorite!). Next, take some melted white chocolate (use high quality, trust me it makes a difference) and dollop it in teaspoon and tablespoon size right over the chocolate. Grab a skinny stick (I used the end of a skinny spoon) and gently pull the white chocolate down to create a “ghost” shape (see above photo). Add eyes using sprinkles or melted chocolate.
Chill. Cut into bars.
And DONE.

See? Pretty easy, right?
And don’t stress about making these perfect. The more imperfect, the spookier they look.
Also, you will notice that my ghosts do not have mouths. I wish I could say this was intentional, but it was really just a careless mistake on my part. You know what though? I kind love these little guys just the way they are. They’re nothing close to a perfect looking ghost, but each is unique, ghostly, and fun.

Honest truth? No matter how much I would LOVE to be skilled in decorating beautiful desserts, it’s not my talent. I can’t pipe frosting all that well, I can’t make perfectly frosted sugar cookies with royal icing, and I am not going to spend five hours trying to make my Halloween treats look perfectly “spooky”.
Nope, I’m not a pro at decorating and I’m fine with that. Over the years I’ve learned to love and embrace the “imperfect” look. The awesome thing about Halloween treats is that the more imperfect they look, the better.
It’s all about that messed up, spooky vibe, so embrace your mistakes, especially with these bars. No one ghost should look another.

Above all, have fun and be creative with these! These bars are great for making with kids, and enjoyed by EVERYONE. You can pack them up and take them to the school Halloween party, or serve them at your adult filled Halloween bash.
Whatever route you go, these ghostly bars will be loved and devoured. Hence, making a double batch is highly recommended.

Lastly, if you make these spooky chocolate peanut butter bars, please be sure to leave a comment and/or give this recipe a rating! Above all, I love to hear from you guys and always do my best to respond to each and every comment. And of course, if you do make this recipe, don’t forget to also tag me on Instagram! Looking through the photos of recipes you all have made is my favorite!
Nutritional information is only an estimate. The accuracy of the nutritional information for any recipe on this site is not guaranteed.
BOO! Chocolate Peanut Butter Bars
These bars require no oven time, use just 6 pantry staple ingredients, and take almost no effort to make. Best part? They're fun to make no matter what your age!
Ingredients
- 1/2 cup honey
- 1/2 cup real maple syrup
- 1 cup creamy peanut butter
- 6 cups corn flakes
- 8-12 ounces semi-sweet or dark chocolate, melted
- 6 ounces white chocolate, melted
- black sprinkles, for decorating (optional)
Instructions
-
1. Line a 9x13 inch baking pan with parchment paper.
2. In a large, microwave safe bowl, melt together the honey, maple, and peanut butter until smooth, about 30 second to 1 minute. Stir in the corn flakes, tossing well to combine. Spread the mix out into the prepared pan, packing it in tightly.
3. Melt the chocolate chips and pour the melted chocolate over the bars, spreading in and even layer.
4. To make the ghosts. Melt the white chocolate, then spoon a small dollop (1 teaspoon for small ghosts and 1 tablespoon for large ghosts) of white chocolate onto the chocolate, making sure each ghost is 1 inch apart from each other. Using a wooden skewers or the end of a skinny spoon, gently drag the white chocolate into a ghost shape, don't worry about making these perfect, the more imperfect they look, the better.
5. Insert 2 small sprinkles for eyes or use additional melted chocolate.
6. Transfer the bars to the fridge and chill 1 hour or until set. Using a sharp knife, cut around the ghost, creating irregular shapes. Keep in the fridge until ready to serve. BOO!
Recipe Notes
*These bars are GOOEY and we like them this way. If you'd like a bar that's less gooey, reduce the maple 1/4 cup and use 1/4 cup brown sugar.

Our Favorite Recipes
Apple Butter Old Fashioned.


Classic flavor combination, displayed in a deliciously festive manner. And please, your skills are flawless! It IS one of your talents 🙂
Thank you so much Liz!
This is soooooooo cute!! Love your Halloween recipes. They look easy to make, yet they are so creative and so cute. Thanks for sharing 🙂
Thank you Maja! I am so glad you like this and hope they turn out amazing for you!
Love these!!!
Thank you Meg!
hey girl- these bars look so yummy! have a great weekend!
Thank you! I hope you have a great weekend as well!
I love this! You make some me great stuff, but this just might be my fav!
Thank you so much Ally!
These are super adorable and actually look doable! Love the pictures and styling too.
Thank you so much Stephanie! I am so glad you like this and hope you try these!
This is SO clever – I love how it turned out!!
Rebecca | http://www.peppermintdolly.com
Thank you Rebecca!
I LOVE this! They remind me of rice krispies treats, only 100x more delicious!
Thank you Christina!
OOOOOOOW this is the cutest thing! and you know what I love? That they look adorable but also realistic to make, I´m always frustrated when I can’t do the pristine decorations on some treats. Plus, they look delicious!
Thank you so much Dan! I am so glad you like these bars!
I am soo making these!
Thank you Aubrey!
Hello!!
These look so cute and so good I really want to try making these!! I was wondering though how did you get the chocolate to harden? I was thinking when I made your brownies with chocolate peanut butter and rice crispys the chocolate layer never hardened and stayed fudge like, even when I put it in the fridge. Is it suppose to be a hardened chocolate layer? How do I make sure I achieve and that and not a poor attempt for fudge? Thank you!
HI! Hmm, that is so odd. I have never had my chocolate not harden up, especially once chilled. What kind of chocolate are you using? Are you mixing anything into the chocolate that might cause it to not harden? Hope I can help and sorry for the trouble!
This looks delish! I always make a cute Halloween treat for my kids and this will be it this year! If you were to use Rice Krispies instead, would you use the same measurements?
Hi! I would probably use close to 7 cups rice krispies since rice krispies are a bit smaller in size, but just add more as needed until you feel like you have a good peanut butter to cereal ratio. Please let me know if you have any other questions. I hope you love this recipe. Thanks so much! xTieghan
DO you think they would work with rice crispies?
I do! Use an equal amount or up to 1 cup more rice krispies since they are a bit smaller in size. Please let me know if you have any other questions. I hope you love this recipe. Thanks so much! xTieghan
This recipe in your cookbook calls for an additional 1/2 cup sugar. Why is it omitted here?
Thanks
HI! I don’t feel the additional 1/2 cup of sugar is needed. Please let me know if you have any other questions. I hope you love this recipe. Thanks so much! xTieghan
these are adorable!! and yummy!
Thank you Ruth!
Thank you for sharing! These bars are delicious and fun to make.
Thank you Sue!
These turned out so cute and they were easy! The only problem I had was, even after chilling, the corn flake layer was gooey and a little more moist then I think would have been ideal. Not sure if it was our ingredients or we measured something wrong, or if that’s just how they are. I would make them again though, but I might experiment with the ingredients a bit to see if I could get a less moist bottom layer.
Hey CJ! The bottom layer is meant to be gooey. If you want something drier, try adding more cornflakes to “soak” up the peanut butter. Please let me know if you have any other questions. So glad you love this recipe. Thanks so much! xTieghan
Such fun bars for Halloween!!
Thank you Laura!
Chocolate peanut butter ANYTHING is a winning combination. I love cereal bars–they are super crunchy, sweet, and perfect for any snack. Happy Halloween!
YES! Thank you Cassie!
Loved these BUT as others have noted, they were super gooey and the bottom did not hold well together. They were delicious (what’s not to love with PB and chocolate?!) but I followed the recipe as is and let them sit overnight and still barely hold together. Would need to adjust the recipe to consider making again.
Thank you Emily! I will definitely try to figure out what is going on!
How did you make the spiderwebs? Concentric circles and used toothpick to pull from the middle? I think I’m going to make a double batch for a Halloween potluck at work!
Hey Alix!
To make webs, pipe the white chocolate into circle spirals. Starting at the center of each spiral, drag a toothpick across the chocolate moving out to create a webbing effect. Repeat this process around the entire circle and then and the remaining spirals.
Please let me know if you have other questions. I hope you love this recipe! thanks so much! xTieghan
I made these last night and t hey came out great! I opted for the version with brown sugar and less maple syrup so they’d be less gooey. They seem to be holding together nicely. I’m giving them to friends who are watching my cats while I go away on vacation. I am sure they will be a hit. My ghost making skills are pretty poor though but they sure do taste delicious!! Thank you for the great recipes. Oh also super easy to make!!
I am so glad you loved these Linda! That is so sweet of you to give these to friends as well! Thank you!
Hi, I made these bars tonight and they really are yummy. Since Halloween is over, I decided to just do a random drizzle with the white chocolate. I used Nestle toll house white chocolate chips but they didn’t want to melt. I put them in the microwave and they became very dry so I started over using a double boiler. That was better but it still didn’t melt enough for drizzling. Did I use the wrong kind of white chocolate? Even though they weren’t beautiful, they tasted great! I will try again after I hear from you. Thanks for your time.
Hey Becky! Some brands of white chocolate do not melt well. I recommend ghirardelli white chocolate and melted at a very, very low temperature. LOW heat on the stover, stirring consistently is best. Please let me know if you have any other questions. So glad you love this recipe. Thanks so much and happy Thanksgiving! xTieghan
I’ve made these bars twice. Once as a gift and received lots of compliments and again this week for our company cookie swap. These bars won the cookie swap contest!! So easy to make and SO delicious! Thanks Tieghan
I am so glad everyone loved these bars Linda! Thank you so much!
These were a big hit at Halloween and lots of fun to make!
Hi Tieghan! I’m so glad I (re)discovered your blog because it gives me ideas for a Halloween party I have to bake for on Friday. Would you me so kind and add the metrics for the Halloween recipes? (it’s a suggestion because I bet tons of people are interested by your Halloween recipes and may be like me and never worked with cups). That’d be soooo nice! But if you can’t don’t worry, your website is the bomb. xoxo
Hi Eva! I am so glad you have discovered my blog and I hope you continue to love it! Thank you so much! xTieghan
These were yummy and quite simple. I used the “less gooey” version and was glad as they were still a little gooey, but still good. I did have a problem cutting though as my chocolate cracked and even a couple of my white ghosts. Did you have that problem at all? Perhaps I should have added a little coconut oil to the chocolate while melting.
HI! I don’t have issues with my chocolate cracking ever. What brand chocolate are you using for both the chocolate and white chocolate? I wonder if that might be the issue? you can try adding coconut oil to see if that helps! Please let me know if you have any other questions. I am so glad you love this recipe! Thank you! xTieghan ???
These were AMAZING! So easy and all the flavors and textures are SPOT ON! Seriously so yummy! Easy and classic! Thanks girl!
So glad to hear that Andrea! xTieghan
Wait!?! Scary and delicious? Lol, mind is blown! Love these chocolates, I need to make them!
Yes! I hope you do, Steven! Thank you so much! xTieghan
I love your recipes
Can the bark be made with Rice Krispies??
Hey Maureen! I am sure an equal amount if rice krispies will great. Love that idea! Please let me know if you have any other questions. I hope you love this recipe! Thank you! xTieghan
These tasted great, but the bottom layer didn’t ‘stick’ to the chocolate completely. Chunks fell off when trying to place the pieces into a different container. As another reviewer mentioned, my chocolate also cracked when cutting.
Thank you so much Sara! I am really glad this recipe turned out so well for you! xTieghan
Well loved by all! I did cut down on the maple syrup so they were not as gooey, which was a good choice. They are super sweet so next time I will omit the brown sugar sub. I had trouble not picking at these all day! So yummy, will make again!
Thank you so much Danielle! I am really glad you enjoyed this recipe! xTieghan